เตรียมไฟล์ *FortiClient VPN* สำหรับติดตั้ง โดยดาวน์โหลดจากเว็บ [https://www.fortinet.com/support/product-downloads](https://www.fortinet.com/support/product-downloads)
- เข้าเว็บไซต์ [https://www.fortinet.com/support/product-downloads](https://www.fortinet.com/support/product-downloads) เพื่อดาวน์โหลดไฟล์ติดตั้ง FortiClienเลือกหัวข้อ **Product Downloads** และเลือกที่ **ForiClient VPN only** 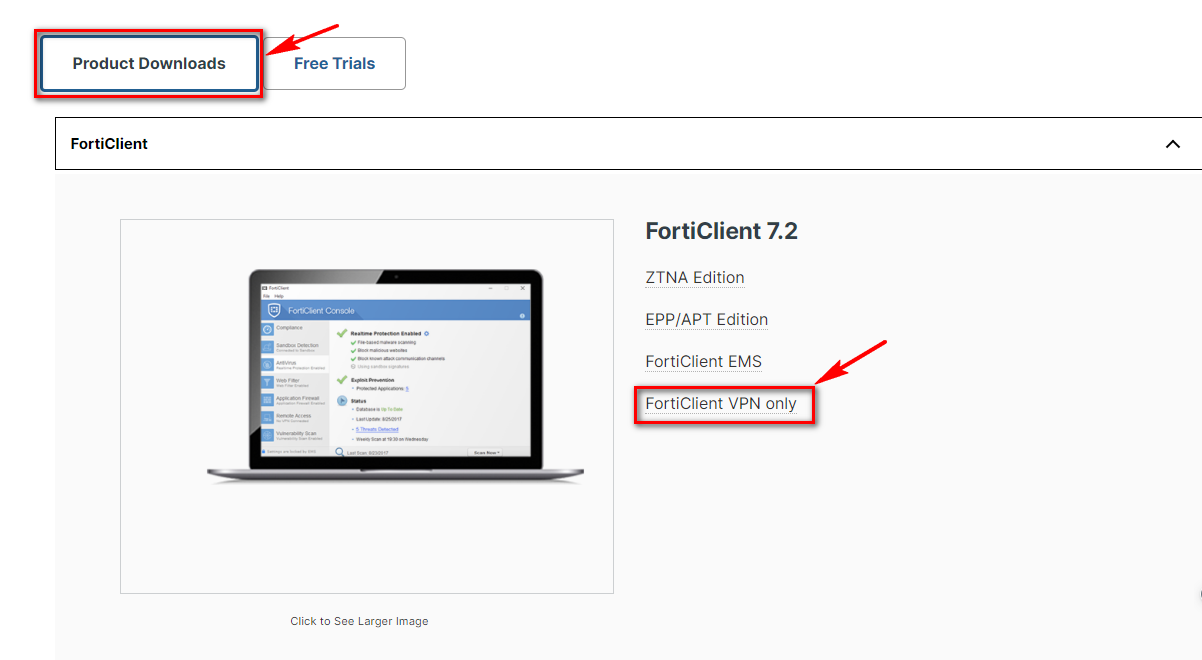 - เลื่อนลงมาให้พบกับหัวข้อ **FortiClient VPN** [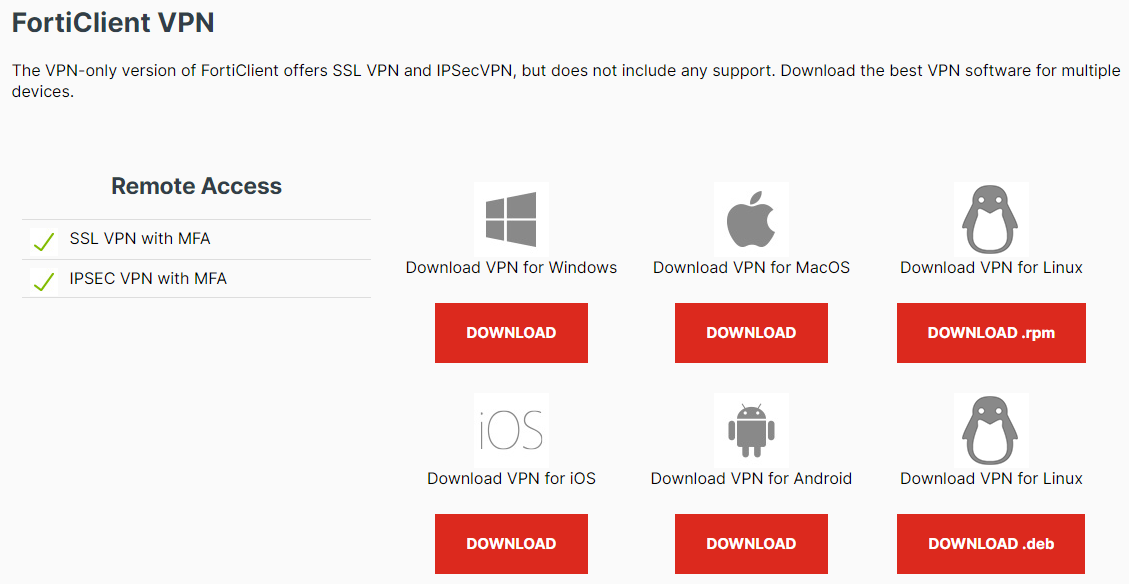](https://bookstack.wu.ac.th/uploads/images/gallery/2023-09/image-1695709263967.png) --- #### **สำหรับ Windows****สำหรับ Windows ให้เลือก Download VPN for Windows**
[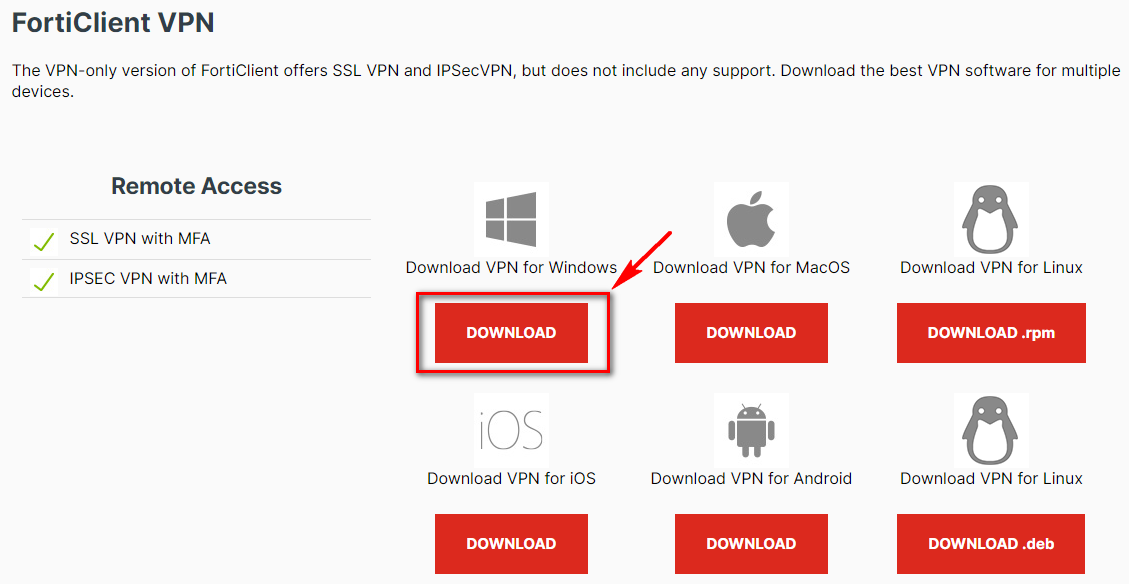](https://bookstack.wu.ac.th/uploads/images/gallery/2023-09/image-1695709306862.png) 1\. เลือก Download ที่หัวข้อ Download VPN for Windows [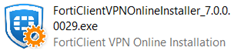](https://bookstack.wu.ac.th/uploads/images/gallery/2023-09/image-1695711367861.png) \*ตัวอย่างไฟล์สำหรับติดตั้ง FortiClient VPNตัวติดตั้งอาจจะมี Version ที่แตกต่างกันจากในคู่มือ
2\. ดับเบิ้ลคลิกที่ Icon ไฟล์ติดตั้ง จะเข้าสู่หน้าจอดาวน์โหลดไฟล์ installer ตัวเต็มจาก Internet โดยความเร็วขึ้นอยู่กับการเชื่อมต่อ network ของผู้ใช้งาน [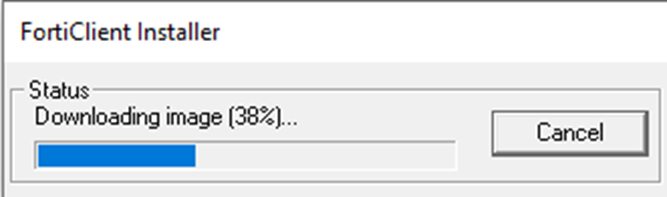](https://bookstack.wu.ac.th/uploads/images/gallery/2023-09/image-1695712091704.png) 3\. เมื่อดาวน์โหลดเรียบร้อย จะปรากฏหน้าต่างให้ติดตั้งโปรแกรม ให้ทำเครื่องหมายถูก ที่ช่อง Yes, I have…. แล้วกดปุ่ม **"Next"** [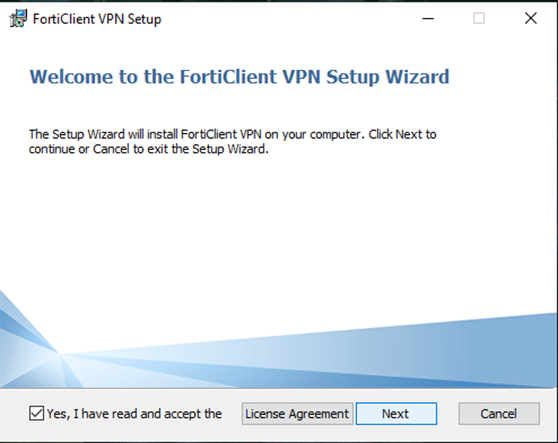](https://bookstack.wu.ac.th/uploads/images/gallery/2023-09/image-1695712055406.png) 4\. เข้าสู่ขั้นตอนเลือก Folder ( ปกติเป็น Default) สำหรับติดตั้ง เลือก **"Next"** [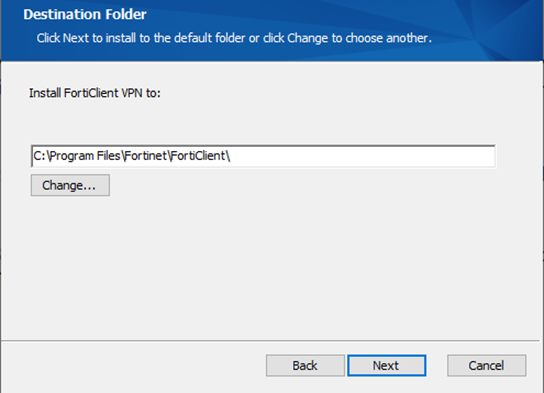](https://bookstack.wu.ac.th/uploads/images/gallery/2023-09/image-1695712176995.png) 5\. กดปุ่ม **"Install"** เพื่อทำการติดตั้งโปรแกรม [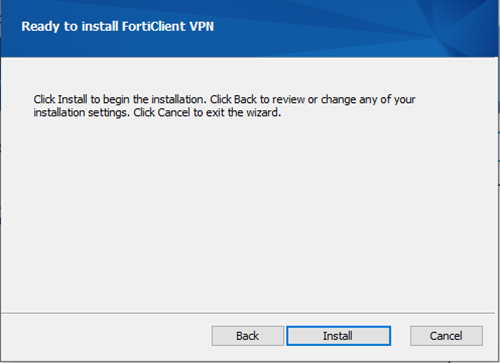](https://bookstack.wu.ac.th/uploads/images/gallery/2023-09/image-1695712234270.png) 6\. ใช้เวลาชักครู่ รอจนกว่าโปรแกรมจะติดตั้งเสร็จ [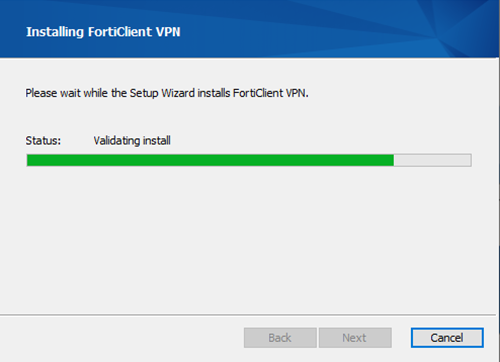](https://bookstack.wu.ac.th/uploads/images/gallery/2023-09/image-1695712280776.png)หลังติดตั้งเสร็จเรียบร้อยแล้ว บนหน้าจอ Desktop มองหา Icon FortiClient VPN ให้คลิกเพื่อเปิดใช้งาน [](https://bookstack.wu.ac.th/uploads/images/gallery/2023-09/image-1695712360390.png)
##### **การตั้งค่า Windows) เพื่อเชื่อมต่อและใช้งาน** 1\. คลิกที่ Icon  โปรแกรมจะแสดงหน้าเพื่อเปิดใช้งานครั้งแรก 2\. ทำเครื่องหมายถูกที่ช่อง I acknowledge…. แล้วกดปุ่ม I accept [](https://bookstack.wu.ac.th/uploads/images/gallery/2023-09/image-1695712534246.png) 3\. คลิกเลือก Configure VPN [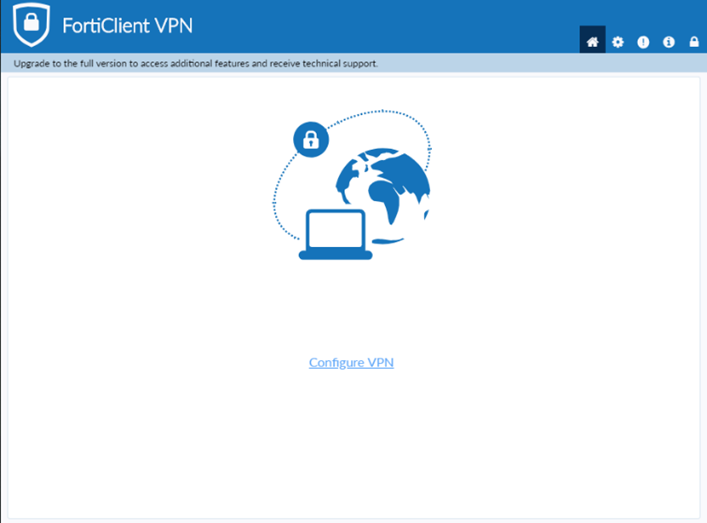](https://bookstack.wu.ac.th/uploads/images/gallery/2023-09/image-1695712588990.png) 4\. ให้กำหนดค่าตามข้อมูลที่กำหนดไว้ข้างล่างดังนี้ - - - - - - - VPN เลือกแบบ **SSL-VPN** - Connection Name: **WU-VPN** (หรือใส่ชื่อตามต้องการ) - Description: **WU\_VPN\_Connect** (หรือใส่ข้อความตามต้องการ) - Remote Gateway: **vpn.wu.ac.th** - ทำเครื่องหมายถูกที่ช่อง Customize port ใช้หมายเลข Port: **443** เมื่อกำหนดค่าต่างๆ เสร็จเรียบร้อยแล้ว ให้กดปุ่ม Save [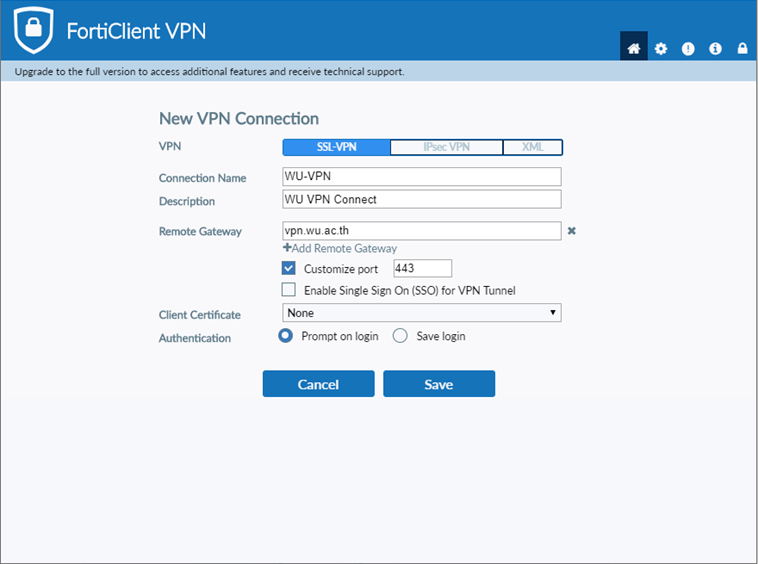](https://bookstack.wu.ac.th/uploads/images/gallery/2023-09/image-1695712758860.png) 5\. จากนั้นโปรแกรมจะขึ้นหน้าต่าง ให้ Login ด้วย Username/Password ที่ใช้ Login Internet ภายใน หรือระบบ Intranet [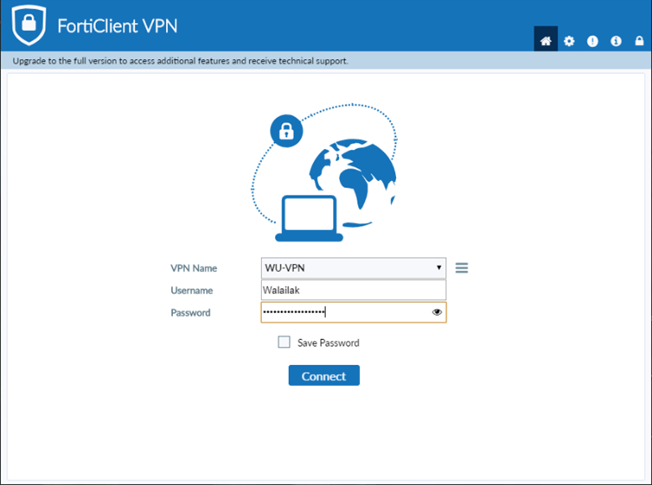](https://bookstack.wu.ac.th/uploads/images/gallery/2023-09/image-1695712908744.png)หาก Login ผ่านโปรแกรมจะทำการเชื่อมต่อ VPN โดยระบุหมายเลข IP Address และแสดง Icon มุมขวาของ Windows เพื่อเป็นการยืนยันว่าเชื่อมต่อ VPN สำเร็จแล้ว
[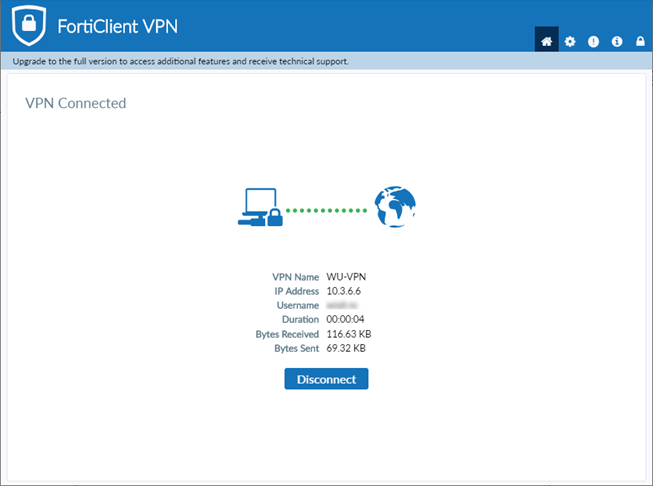](https://bookstack.wu.ac.th/uploads/images/gallery/2023-09/image-1695712956431.png)[](https://bookstack.wu.ac.th/uploads/images/gallery/2023-09/image-1695712969763.png) ##### **การยกเลิกการเชื่อมต่อ VPN (Windows)** เมื่อสิ้นสุดการใช้งานสามารถยกเลิกการเชื่อมต่อ VPN ได้ดังนี้ คลิกขวาที่ สัญลักษณ์มุมล่างขวา และกดปุ่ม **"Disconnect"** [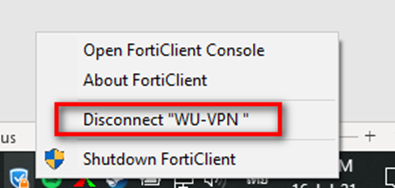](https://bookstack.wu.ac.th/uploads/images/gallery/2024-05/image-1715584848149.png)หากเปิดหน้าต่างของ FortiClient VPN อยู่แล้วสามารถกดปุ่ม **"Disconnect"** ได้เลย หรือ กดปุ่ม **"Shutdown FortiClient"** ได้เหมือนกัน
--- #### **สำหรับ MacOS****สำหรับ MacOS ให้เลือก Download VPN for MacOS**
[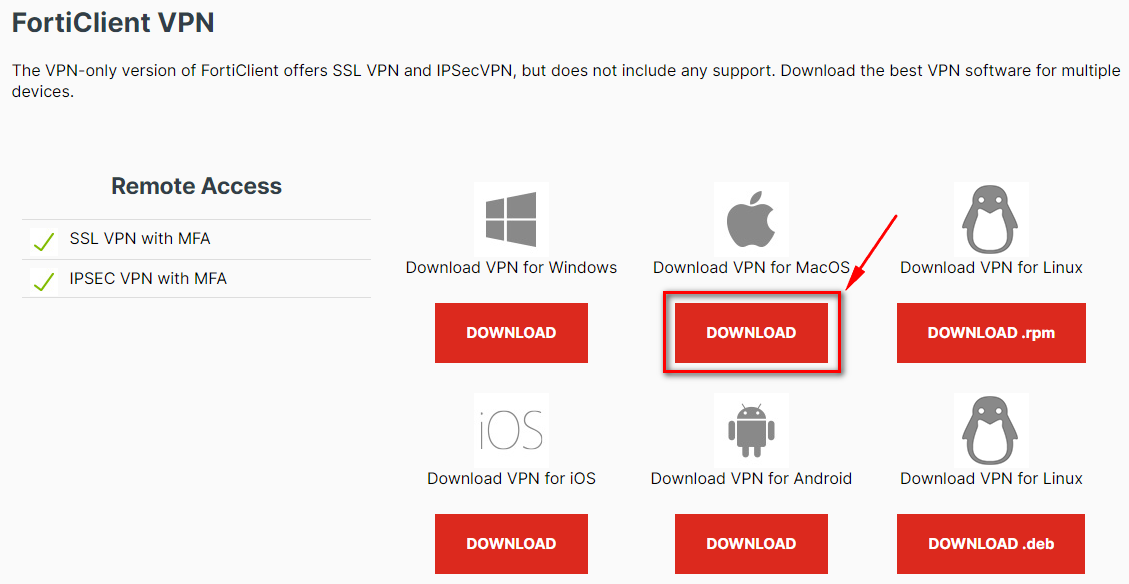](https://bookstack.wu.ac.th/uploads/images/gallery/2024-05/image-1715572323055.png) 1\. เลือก Download ที่หัวข้อ Download VPN for Windows [](https://bookstack.wu.ac.th/uploads/images/gallery/2024-05/image-1715572530676.png) \*ตัวอย่างไฟล์สำหรับติดตั้ง FortiClient VPNตัวติดตั้งอาจจะมี Version ที่แตกต่างกันจากในคู่มือ
2\. ดับเบิ้ลคลิกที่ Icon ไฟล์ติดตั้ง จะเข้าสู่หน้าจอติดตั้งโปรแกรม [](https://bookstack.wu.ac.th/uploads/images/gallery/2024-05/image-1715572616325.png) 3\. จากนั้นกด **"Open"** เพื่อดเปิดโปรแกรมติดตั้ง [](https://bookstack.wu.ac.th/uploads/images/gallery/2024-05/image-1715573198033.png) 4\. โปรแกรมจะแสดงสถานะ Downloading ผ่าน Internet โดยความเร็วขึ้นอยู่กับการเชื่อมต่อ network ของผู้ใช้งาน [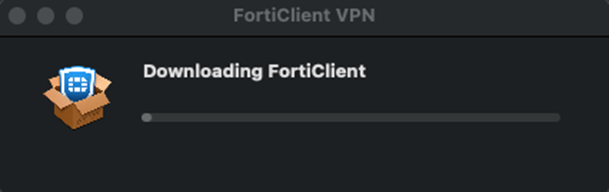](https://bookstack.wu.ac.th/uploads/images/gallery/2024-05/image-1715573428401.png) 5\. หากขึ้นข้อความ Downloaded แล้วให้กดปุ่ม **"Install"** เพื่อดำเนินการติดตั้ง [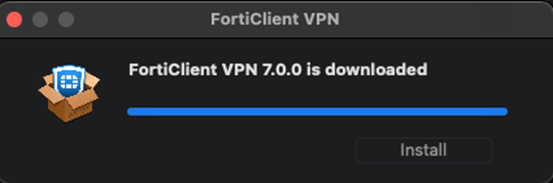](https://bookstack.wu.ac.th/uploads/images/gallery/2024-05/image-1715573437638.png) 6\. หลังจากนั้นให้กดปุ่ม **"Continue"** [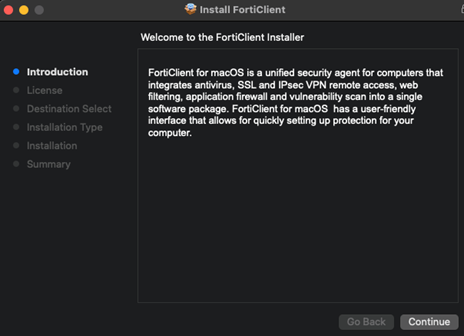](https://bookstack.wu.ac.th/uploads/images/gallery/2024-05/image-1715573625140.png) [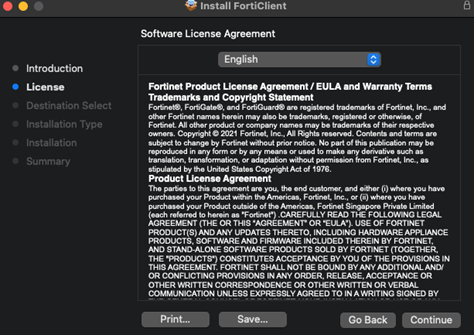](https://bookstack.wu.ac.th/uploads/images/gallery/2024-05/image-1715573667769.png) 7\. หากปรากฏหน้าจอตามด้านล่าง ให้กดปุ่ม **"Agree"** [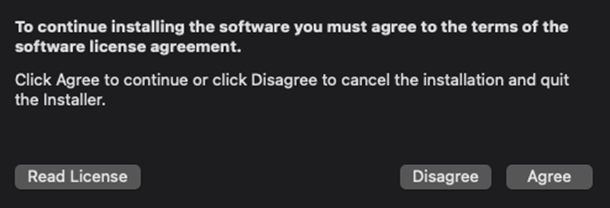](https://bookstack.wu.ac.th/uploads/images/gallery/2024-05/image-1715573754834.png) 8\. ขั้นตอนต่อไปกดปุ่ม **"Install"** [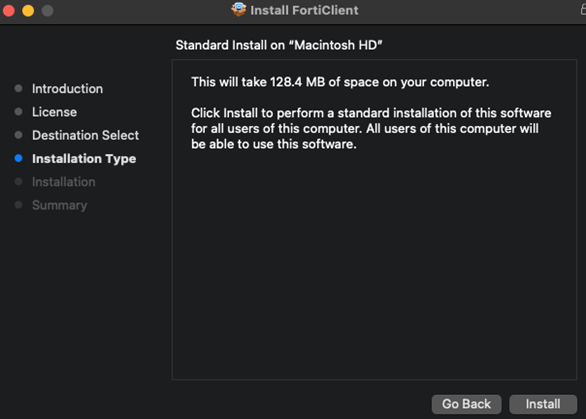](https://bookstack.wu.ac.th/uploads/images/gallery/2024-05/image-1715573808737.png) 10\. เมื่อติดตั้งเรียบร้อยแล้ว จะขึ้นหน้าต่างตามภาพด้านล่างนี้ จากนั้นให้กดปุ่ม "Close" [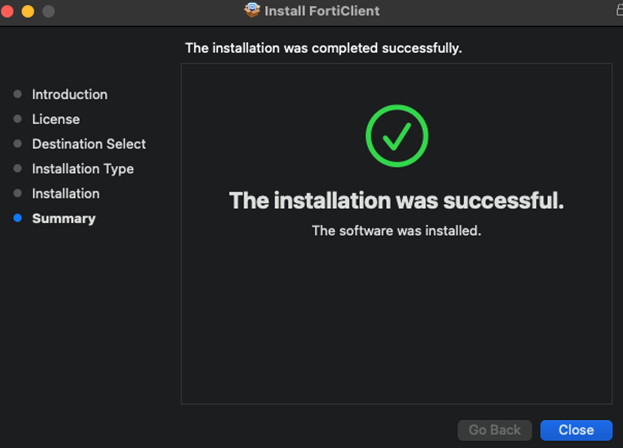](https://bookstack.wu.ac.th/uploads/images/gallery/2024-05/image-1715573841326.png) 11\. ค้นหาชื่อโปรแกรม "FortiClient" [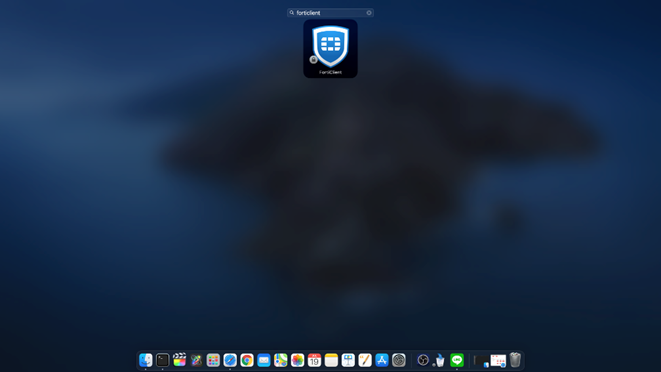](https://bookstack.wu.ac.th/uploads/images/gallery/2024-05/image-1715573933987.png) ##### **การตั้งค่า VPN(MacOS) เพื่อเชื่อมต่อและใช้งาน** 1\. คลิกที่ Icon  โปรแกรมจะแสดงหน้าเพื่อเปิดใช้งานครั้งแรก 2\. ทำเครื่องหมายถูกที่ช่อง I acknowledge…. แล้วกดปุ่ม **"I accept"** [](https://bookstack.wu.ac.th/uploads/images/gallery/2023-09/image-1695712534246.png) 3\. คลิกเลือก Configure VPN [](https://bookstack.wu.ac.th/uploads/images/gallery/2023-09/image-1695712588990.png) 4\. ให้กำหนดค่าตามข้อมูลที่กำหนดไว้ข้างล่างดังนี้ - - - - - - - VPN เลือกแบบ **SSL-VPN** - Connection Name: **WU-VPN** (หรือใส่ชื่อตามต้องการ) - Description: **WU\_VPN\_Connect** (หรือใส่ข้อความตามต้องการ) - Remote Gateway: **vpn.wu.ac.th** - ทำเครื่องหมายถูกที่ช่อง Customize port ใช้หมายเลข Port: **443** เมื่อกำหนดค่าต่างๆ เสร็จเรียบร้อยแล้ว ให้กดปุ่ม Save [](https://bookstack.wu.ac.th/uploads/images/gallery/2023-09/image-1695712758860.png) 5\. จากนั้นโปรแกรมจะขึ้นหน้าต่าง ให้ Login ด้วย Username/Password ที่ใช้ Login Internet ภายใน หรือระบบ Intranet [](https://bookstack.wu.ac.th/uploads/images/gallery/2023-09/image-1695712908744.png)หาก Login ผ่านโปรแกรมจะทำการเชื่อมต่อ VPN โดยระบุหมายเลข IP Address และแสดง Icon มุมขวาของ Windows เพื่อเป็นการยืนยันว่าเชื่อมต่อ VPN สำเร็จแล้ว
[](https://bookstack.wu.ac.th/uploads/images/gallery/2024-05/image-1715574521410.png) [](https://bookstack.wu.ac.th/uploads/images/gallery/2023-09/image-1695712956431.png) ##### **การยกเลิกการเชื่อมต่อ VPN (MacOS)** เมื่อสิ้นสุดการใช้งานสามารถยกเลิกการเชื่อมต่อ VPN ได้ดังนี้ คลิกขวาที่ สัญลักษณ์มุมบนขวา และกดปุ่ม **"Disconnect"** [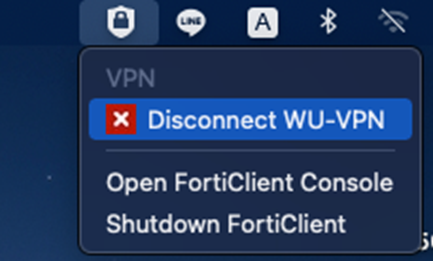](https://bookstack.wu.ac.th/uploads/images/gallery/2024-05/image-1715585032716.png)หากเปิดหน้าต่างของ FortiClient VPN อยู่แล้วสามารถกดปุ่ม "Disconnect" ได้เลย
# สำหรับระบบปฏิบัติการ Android และ iOS ### **การ Download และติดตั้ง FortiClient VPN** #### **สำหรับ Android** 1\. สามารถ Download โปรแกรมได้โดยตรงจาก Google Play โดยค้นหาคำว่า **“FortiCleint VPN”**[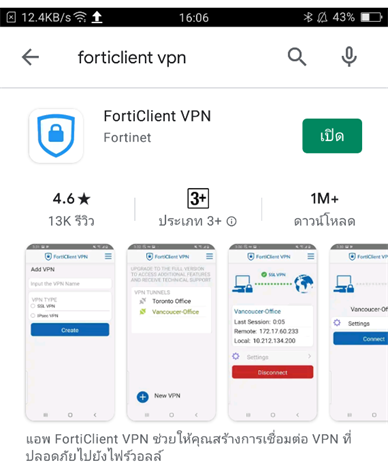](https://bookstack.wu.ac.th/uploads/images/gallery/2024-05/image-1715586349964.png) 2\. ติดตั้ง Application ให้เรียบร้อย เปิด Application ขึ้นมาปรากฏหน้าต่างดังนี้ จากนั้นให้เลือก New VPN [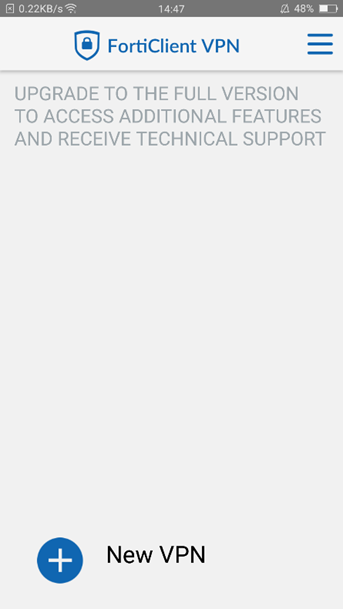](https://bookstack.wu.ac.th/uploads/images/gallery/2024-05/image-1715586413413.png) 3\. ให้กำหนดค่าตามข้อมูลที่กำหนดไว้ข้างล่างดังนี้ - - - - VPN Name: **WU-VPN** (หรือใส่ชื่อตามต้องการ) - VPN TYPR: **SSL VPN** หลังจากนั้นกดปุ่ม Create [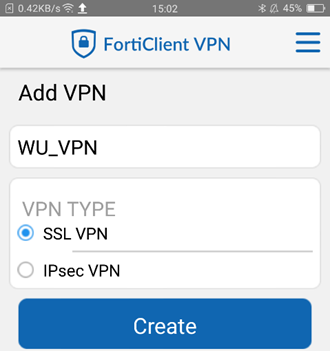](https://bookstack.wu.ac.th/uploads/images/gallery/2024-05/image-1715586542122.png) 4\. หลังจากนั้น เข้าสู่ตั้งค่าสำหรับการเชื่อมต่อ VPN โดยให้กำหนดค่าตามข้อมูลที่กำหนดไว้ข้างล่างดังนี้ - - - - Server: **vpn.wu.ac.th** - Port: **443** [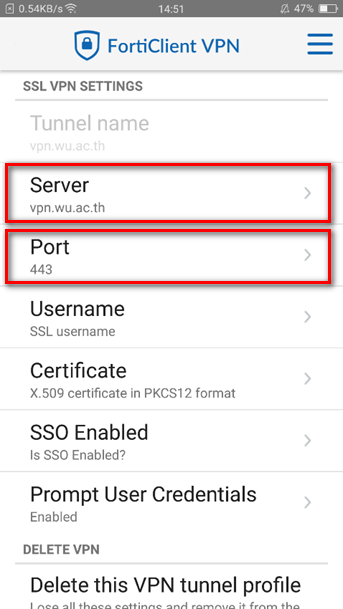](https://bookstack.wu.ac.th/uploads/images/gallery/2024-05/image-1715586679349.png) 5\. กลับสู่เมนูหลัก โดยกดปุ่มที่สัญลักษณ์  (ขีดสามขีด) มุมบนขวา ให้เลือก VPN [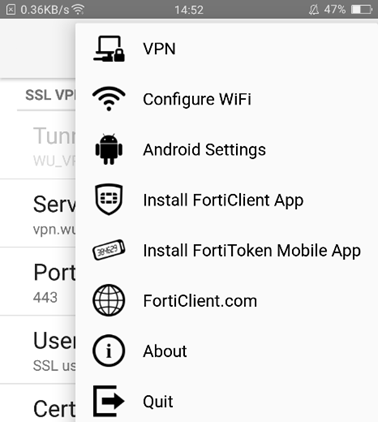](https://bookstack.wu.ac.th/uploads/images/gallery/2024-05/image-1715586974468.png) 6\. จากนั้นให้เลือกที่ VPN TUNNELS ที่สร้างไว้ [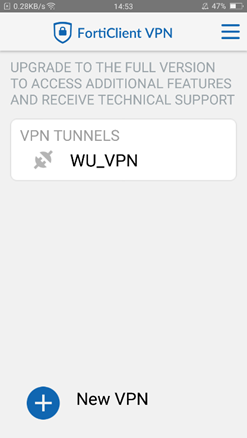](https://bookstack.wu.ac.th/uploads/images/gallery/2024-05/image-1715587046696.png) 7\. เข้าใช้งานโดยกดปุ่ม Connect และใส่ Username / Password ที่เตรียมไว้ที่ใช้ Login Internet ในมหาวิทยาลัย แล้วกด Login [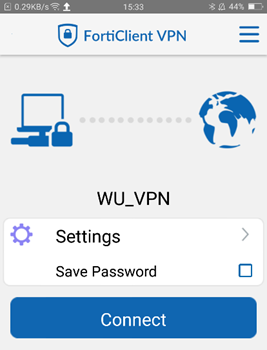](https://bookstack.wu.ac.th/uploads/images/gallery/2024-05/image-1715587093884.png) 8\. หาก Login ผ่าน Application จะทำการเชื่อมต่อ VPN โดยระบุหมายเลข IP Address เพื่อเป็นการยืนยันว่าเชื่อมต่อ VPN สำเร็จแล้ว ดังรูปตัวอย่าง [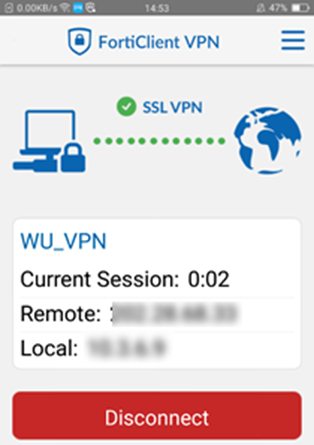](https://bookstack.wu.ac.th/uploads/images/gallery/2024-05/image-1715587153267.png)จากนั้นสามารถใช้งานระบบต่างๆ เสมือนใช้งาน Internet ในมหาวิทยาลัย ทั้งนี้ทั้งนั้นผู้ใช้งานควรสงวนสิทธิ์ในการให้ผู้อื่นเข้าถึงระบบต่างๆ ของมหาวิทยาลัยวลัยและมีความรับผิดชอบใน Username และ Password ของตนเอง
##### **การยกเลิกการเชื่อมต่อ VPN (Android)** เมื่อสิ้นสุดการใช้งานสามารถยกเลิกการเชื่อมต่อ VPN ได้ โดยการกดปุ่ม "Disconnect" [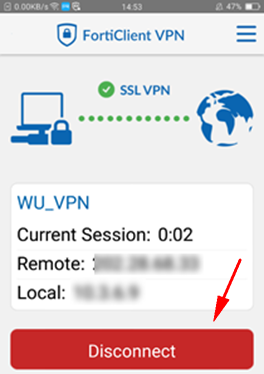](https://bookstack.wu.ac.th/uploads/images/gallery/2024-05/image-1715587622030.png) --- #### **สำหรับ iOS** 1\. สามารถ Download โปรแกรมได้โดยตรงจาก App store โดยค้นหาคำว่า **“FortiCleint VPN”** [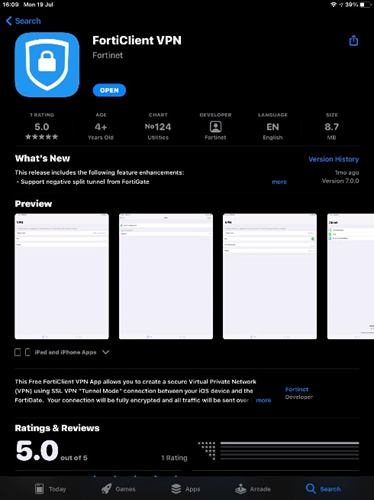](https://bookstack.wu.ac.th/uploads/images/gallery/2024-05/image-1715589695462.png) 2\. ติดตั้ง Application ให้เรียบร้อย เปิด Application ขึ้นมาปรากฏหน้าต่างดังนี้ จากนั้นให้เลือก select connection [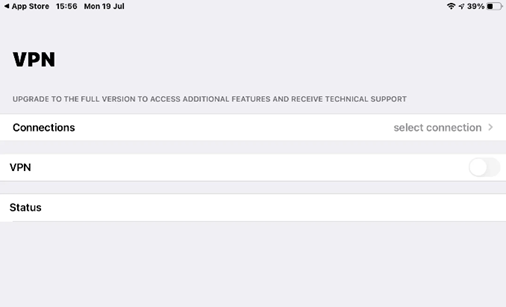](https://bookstack.wu.ac.th/uploads/images/gallery/2024-05/image-1715589731244.png) 3\. ให้กดปุ่ม Add Configuration… เพื่อทำการตั้งค่า VPN [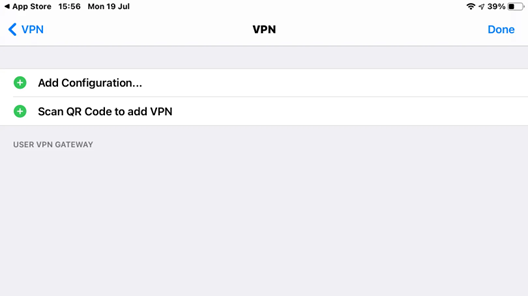](https://bookstack.wu.ac.th/uploads/images/gallery/2024-05/image-1715589796416.png) 4\. ให้กำหนดค่าตามข้อมูลที่กำหนดไว้ข้างล่างดังนี้ - - - - Connection Name: **WU VPN** (หรือใส่ชื่อตามต้องการ) - Remote Gateway: **wu.ac.th** - Port: **443** เมื่อกำหนดค่าต่างๆ เสร็จเรียบร้อยแล้ว ให้กดปุ่ม Save [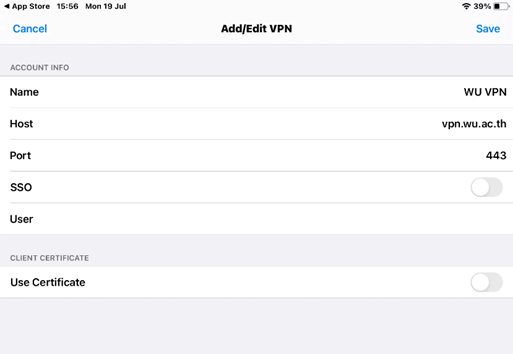](https://bookstack.wu.ac.th/uploads/images/gallery/2024-05/image-1715590735655.png) 5\. กดเลือกที่ User VPN Gateway หลังจากนั้นกดกลับไปที่หน้าแรก โดยกดปุ่ม VPN มุมบนซ้าย [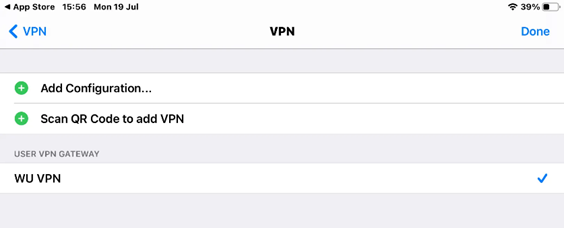](https://bookstack.wu.ac.th/uploads/images/gallery/2024-05/image-1715590792870.png) 6\. เมื่อต้องการเชื่อมต่อ VPN ให้กด Switch ตรงช่อง VPN เป็นสีเขียว และใส่ Username / Password ที่เตรียมไว้ที่ใช้ Login Internet ในมหาวิทยาลัย แล้วกด OK [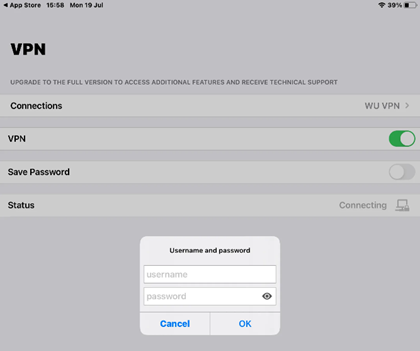](https://bookstack.wu.ac.th/uploads/images/gallery/2024-05/image-1715590824613.png) 7\. หาก Login ผ่าน Application จะทำการเชื่อมต่อ VPN โดยระบุหมายเลข IP Address และมี Status ขึ้นว่า Connected เพื่อเป็นการยืนยันว่าเชื่อมต่อ VPN สำเร็จแล้ว ดังรูปตัวอย่าง [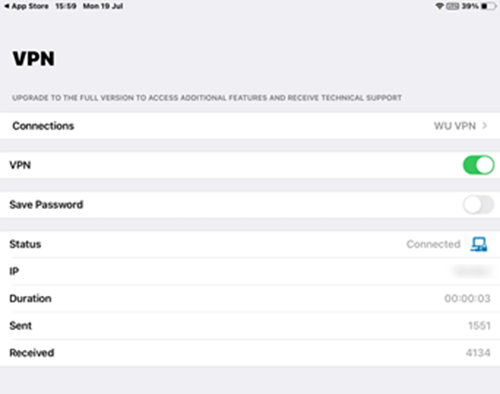](https://bookstack.wu.ac.th/uploads/images/gallery/2024-05/image-1715591370436.png)จากนั้นสามารถใช้งานระบบต่างๆ เสมือนใช้งาน Internet ในมหาวิทยาลัย ทั้งนี้ทั้งนั้นผู้ใช้งานควรสงวนสิทธิ์ในการให้ผู้อื่นเข้าถึงระบบต่างๆ ของมหาวิทยาลัยวลัยและมีความรับผิดชอบใน Username และ Password ของตนเอง
##### **การยกเลิกการเชื่อมต่อ VPN (iOS)** เมื่อสิ้นสุดการใช้งานสามารถยกเลิกการเชื่อมต่อ VPN ได้ โดยการกดปุ่ม **"Switch"** ตรงช่อง VPN เป็นสีเทา Application จะขึ้น Status ให้เป็น Disconnected [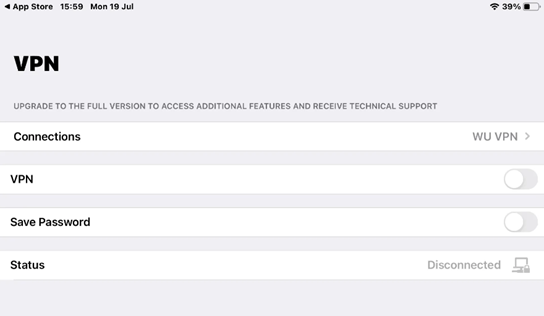](https://bookstack.wu.ac.th/uploads/images/gallery/2024-05/image-1715591529845.png) # สำหรับคอมพิวเตอร์ (Windows / macOS) คู่มือการติดตั้งและตั้งค่าโปรแกรม FortiClient VPN แบบ IPsec VPN สำหรับเข้าใช้งานเครือข่ายภายในผ่านระบบ Windows และ macOS ### **การดาวน์โหลดและติดตั้ง FortiClient VPN**เตรียมไฟล์ *FortiClient VPN* สำหรับติดตั้ง โดยดาวน์โหลดจากเว็บ [https://www.fortinet.com/support/product-downloads](https://www.fortinet.com/support/product-downloads)
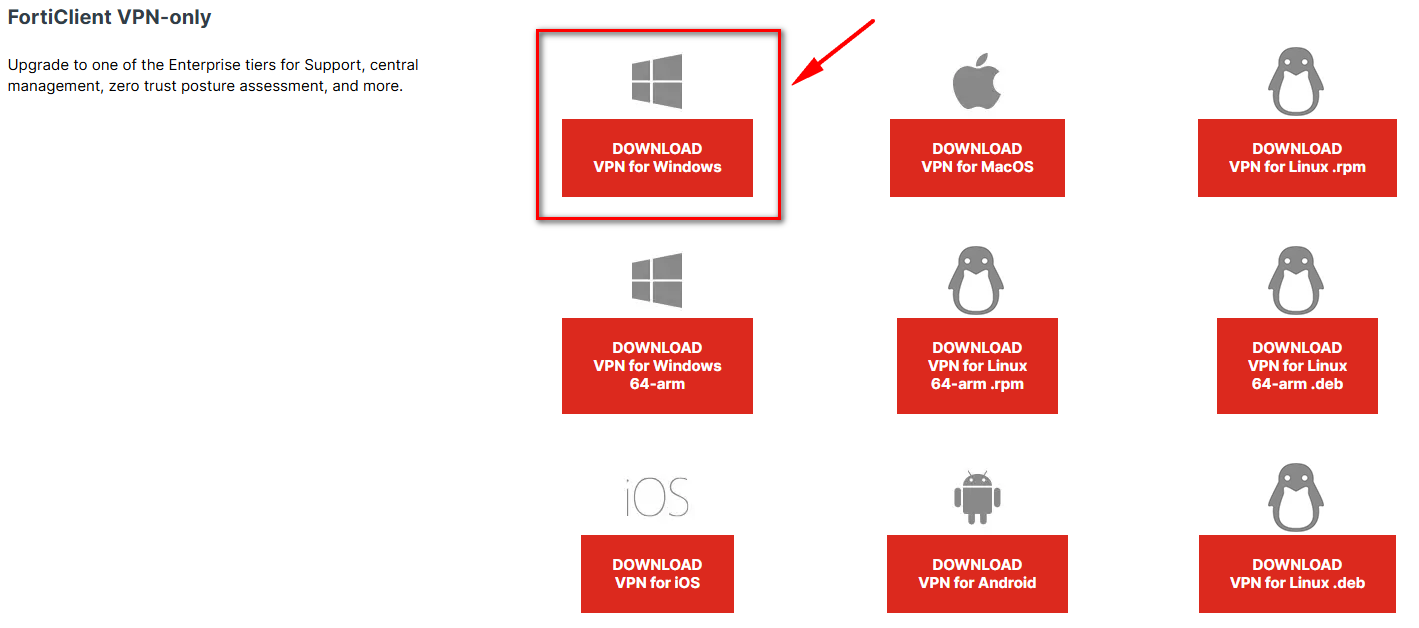
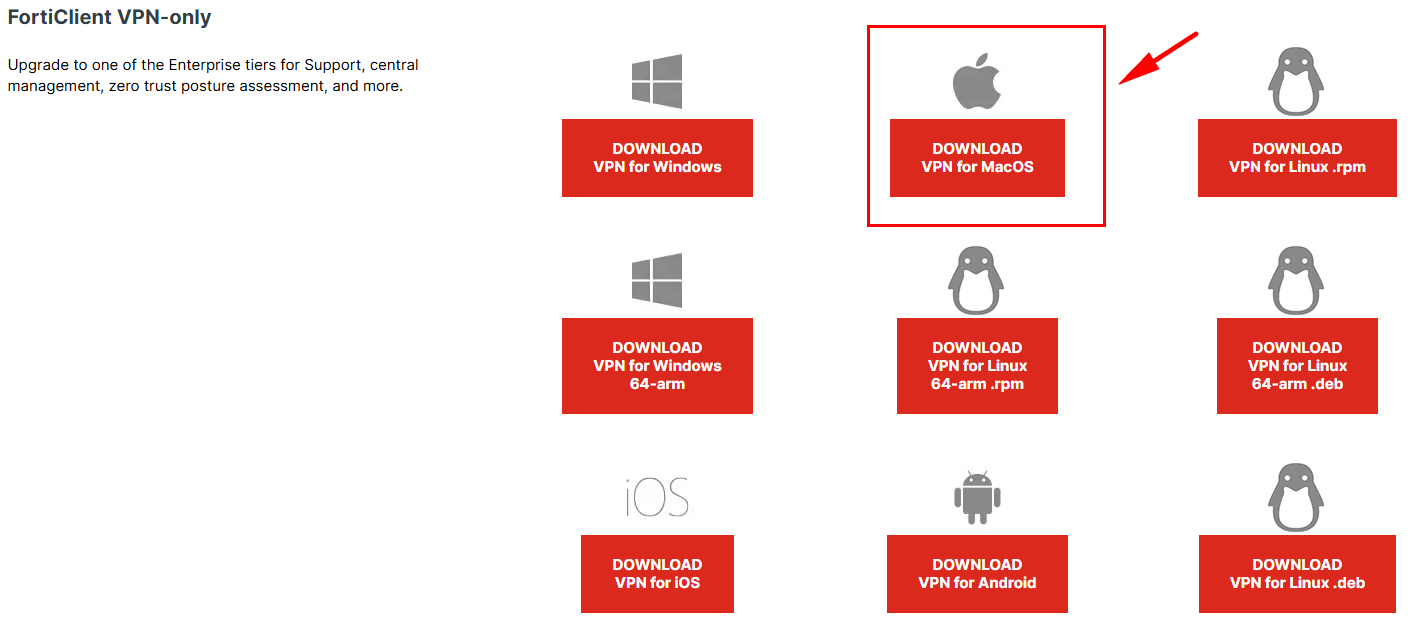
- เข้าเว็บไซต์ [https://www.fortinet.com/support/product-downloads](https://www.fortinet.com/support/product-downloads) เพื่อดาวน์โหลดไฟล์ติดตั้ง - - เลือกหัวข้อ **FortiClient** - เลือกที่ **ForiClient VPN-only** [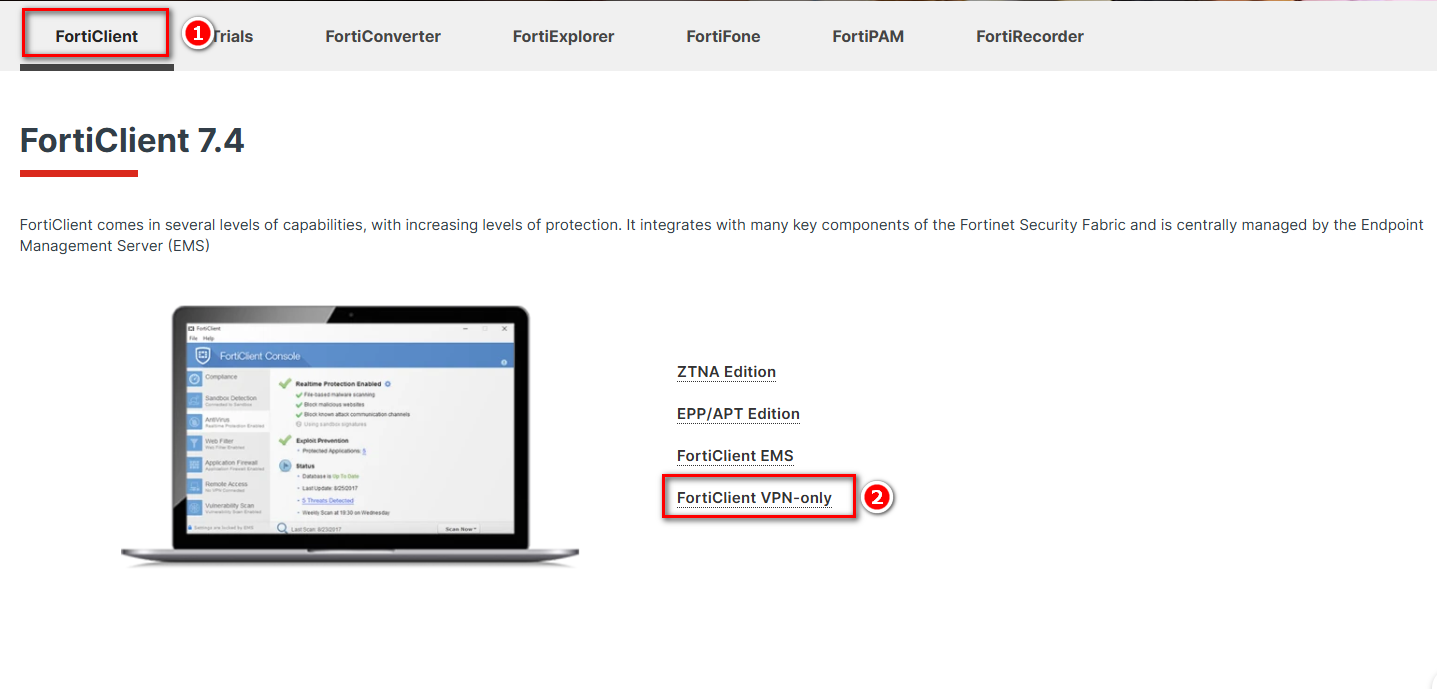](https://bookstack.wu.ac.th/uploads/images/gallery/2026-02/image.png) - ต่อไปจะพบกับหัวข้อ **FortiClient VPN-Only** [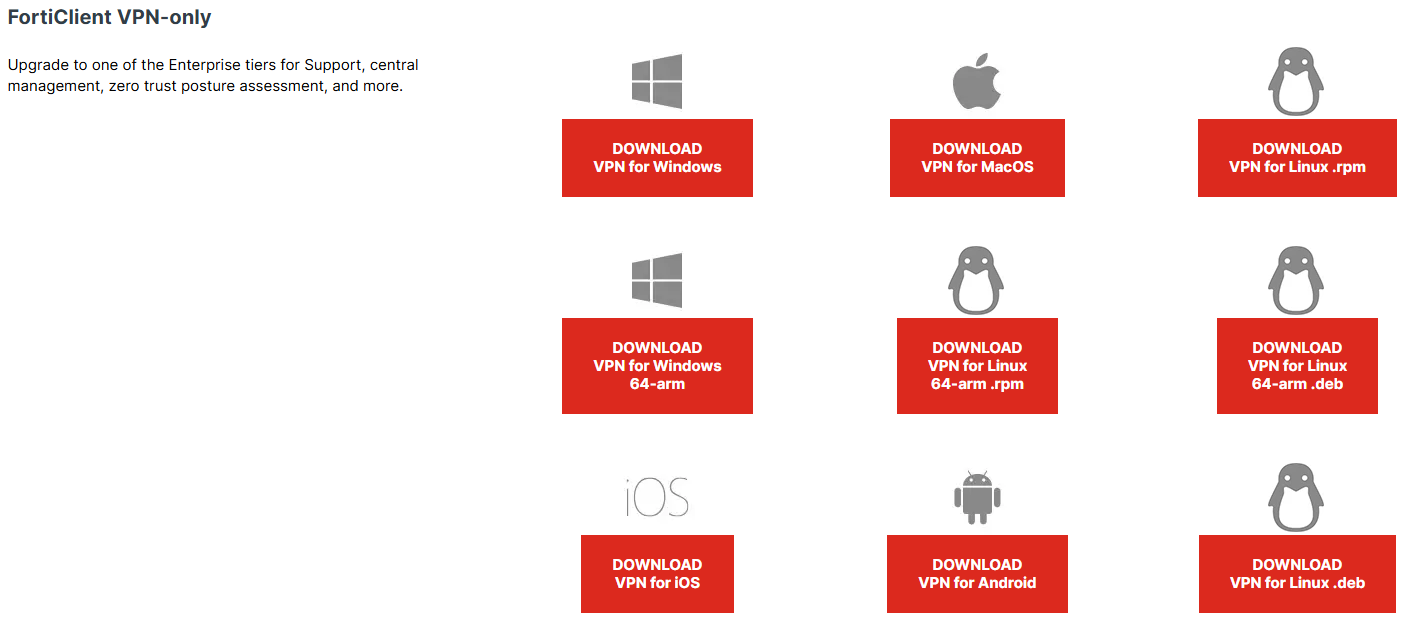](https://bookstack.wu.ac.th/uploads/images/gallery/2026-02/qimimage.png) --- ### สำหรับ **Windows****สำหรับ Windows ให้เลือก DOWNLOAD VPN for Windows**
[](https://bookstack.wu.ac.th/uploads/images/gallery/2026-02/BxAimage.png) 1\. จะปรากฏหน้าต่างให้สำหรับกรอกข้อมูลเบื้องต้นดังนี้ [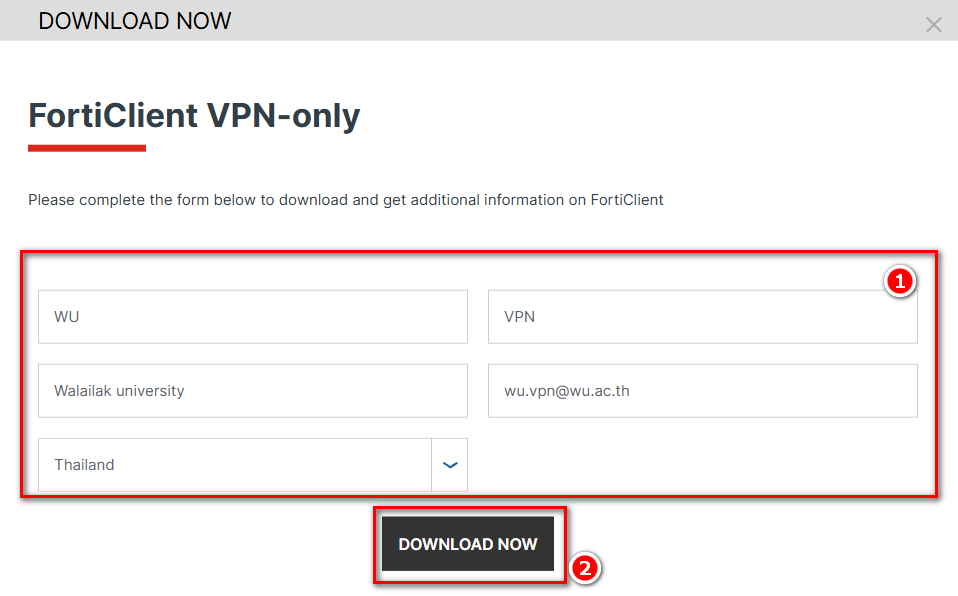](https://bookstack.wu.ac.th/uploads/images/gallery/2026-02/pYiimage.png) 2\. หลังจากนั้นที่ Download จะได้ไฟล์ลักษณะดังรูป [](https://bookstack.wu.ac.th/uploads/images/gallery/2026-02/xtDimage.png) \*ตัวอย่างไฟล์สำหรับติดตั้ง FortiClient VPNตัวติดตั้งอาจจะมี Version ที่แตกต่างกันจากในคู่มือ
3\. ดับเบิ้ลคลิกที่ Icon ไฟล์ติดตั้ง จะเข้าสู่หน้าจอดาวน์โหลดไฟล์ installer ตัวเต็มจาก Internet โดยความเร็วขึ้นอยู่กับการเชื่อมต่อ network ของผู้ใช้งาน [](https://bookstack.wu.ac.th/uploads/images/gallery/2023-09/image-1695712091704.png) 3\. เมื่อดาวน์โหลดเรียบร้อย จะปรากฏหน้าต่างให้ติดตั้งโปรแกรม ให้ทำเครื่องหมายถูก ที่ช่อง Yes, I have…. แล้วกดปุ่ม **"Next"** [](https://bookstack.wu.ac.th/uploads/images/gallery/2023-09/image-1695712055406.png) 4\. เข้าสู่ขั้นตอนเลือก Folder ( ปกติเป็น Default) สำหรับติดตั้ง เลือก **"Next"** [](https://bookstack.wu.ac.th/uploads/images/gallery/2023-09/image-1695712176995.png) 5\. กดปุ่ม **"Install"** เพื่อทำการติดตั้งโปรแกรม [](https://bookstack.wu.ac.th/uploads/images/gallery/2023-09/image-1695712234270.png) 6\. ใช้เวลาชักครู่ รอจนกว่าโปรแกรมจะติดตั้งเสร็จ [](https://bookstack.wu.ac.th/uploads/images/gallery/2023-09/image-1695712280776.png)หลังติดตั้งเสร็จเรียบร้อยแล้ว บนหน้าจอ Desktop มองหา Icon FortiClient VPN ให้คลิกเพื่อเปิดใช้งาน [](https://bookstack.wu.ac.th/uploads/images/gallery/2023-09/image-1695712360390.png)
### --- ### การตั้งค่า **Windows** เพื่อเชื่อมต่อและใช้งาน 1\. คลิกที่ Icon  โปรแกรมจะแสดงหน้าเพื่อเปิดใช้งานครั้งแรก 2\. ทำเครื่องหมายถูกที่ช่อง **I acknowledge….** แล้วกดปุ่ม **I accept** [](https://bookstack.wu.ac.th/uploads/images/gallery/2023-09/image-1695712534246.png) 3\. คลิกเลือก **Configure VPN** [](https://bookstack.wu.ac.th/uploads/images/gallery/2023-09/image-1695712588990.png) 4\. ให้กำหนดค่าตามข้อมูลที่กำหนดไว้ข้างล่างดังนี้ - - - - - - - VPN เลือกแบบ IPsec VPN - Connection Name: **WU-VPN** (หรือใส่ชื่อตามต้องการ) - Description: **WU\_VPN\_Connect** (หรือใส่ข้อความตามต้องการ) - Remote Gateway: **vpn.wu.ac.th** - Authentication Method เลือกเป็น "**Pre-Shared key"** และใส่ key ในช่องว่าง **wu@vpn** - ทำเครื่องหมายถูกที่ช่อง Enable Single Sign on (SSO) for VPN Tunnel ใส่หมายเลข Port: **2002** กดที่เครื่องหมาย **+ Advanced Settings** ไปที่ VPN Settings ตั้งค่าดังนี้ - - - - - - - หัวข้อ IKE ให้เลือก **Version 2** กดที่เครื่องหมาย **+ Advanced Settings** ไปที่ Phase 1 ตั้งค่าดังนี้ - - - - - - หัวข้อ DH Group ให้ติ๊กเลือก **5** และ **20** [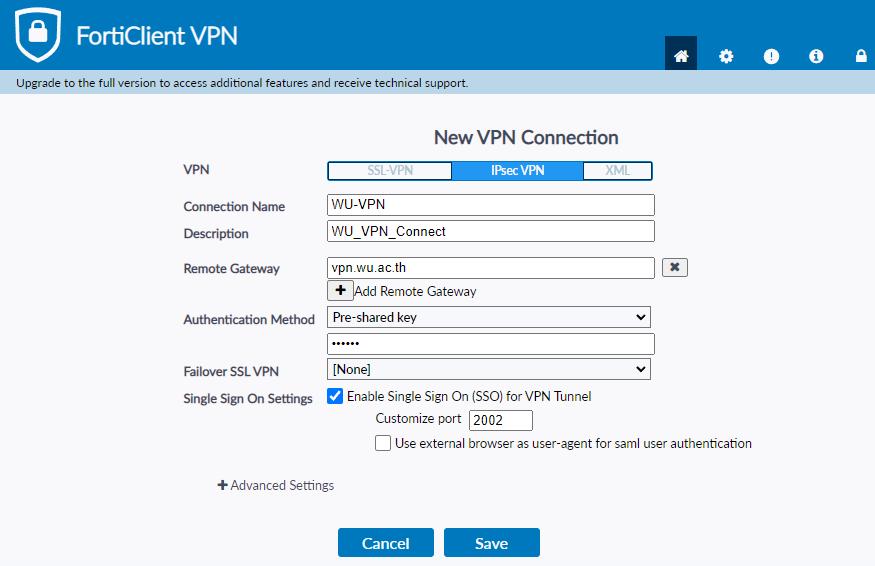](https://bookstack.wu.ac.th/uploads/images/gallery/2026-02/7d3image.png) [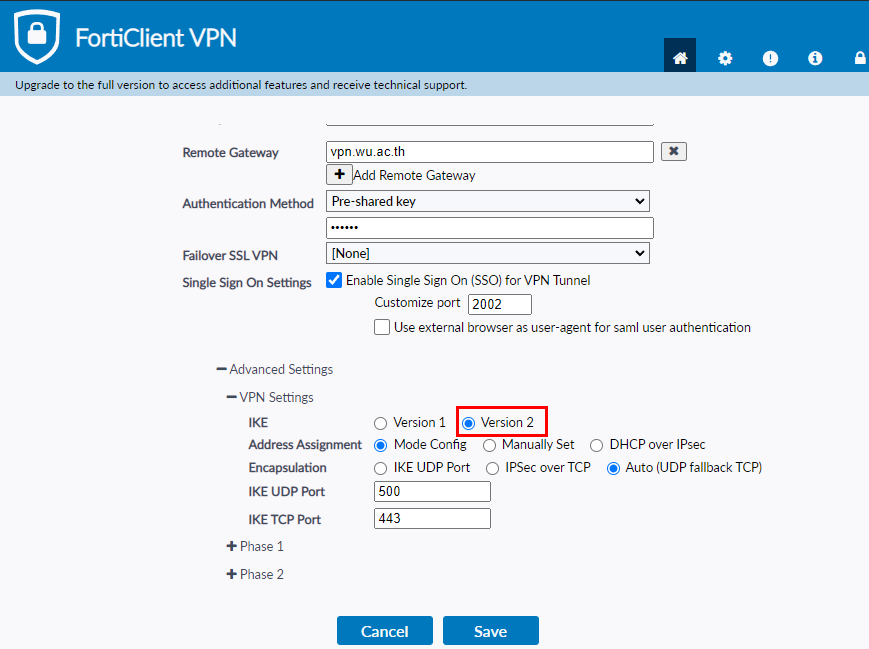](https://bookstack.wu.ac.th/uploads/images/gallery/2026-02/ieVimage.png) [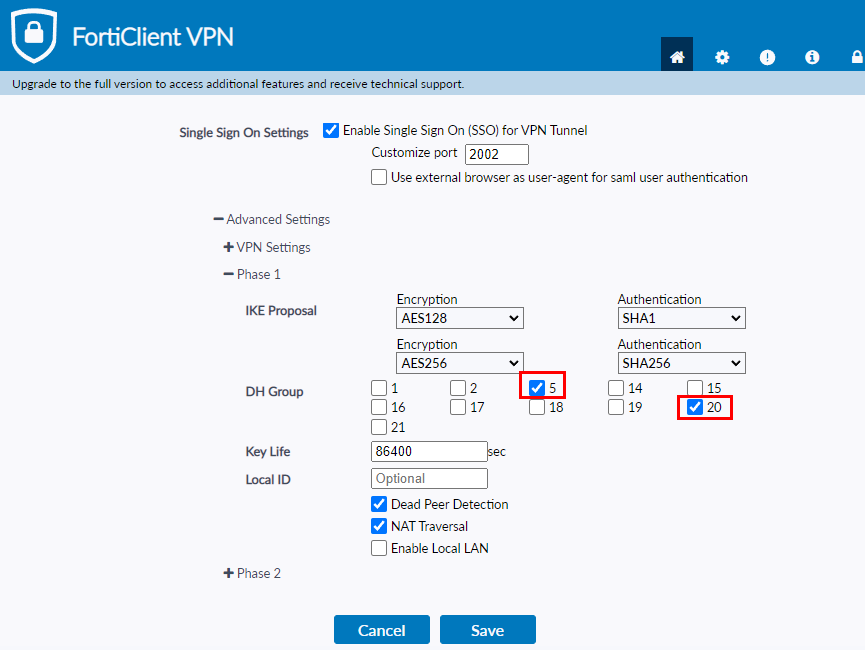](https://bookstack.wu.ac.th/uploads/images/gallery/2026-02/24Cimage.png) เมื่อกำหนดค่าต่างๆ เสร็จเรียบร้อยแล้ว ให้กดปุ่ม **Save** 5\. จากนั้นโปรแกรมจะขึ้นหน้าต่าง ให้ กด **Connect** เพื่อเชื่อมต่อ VPN [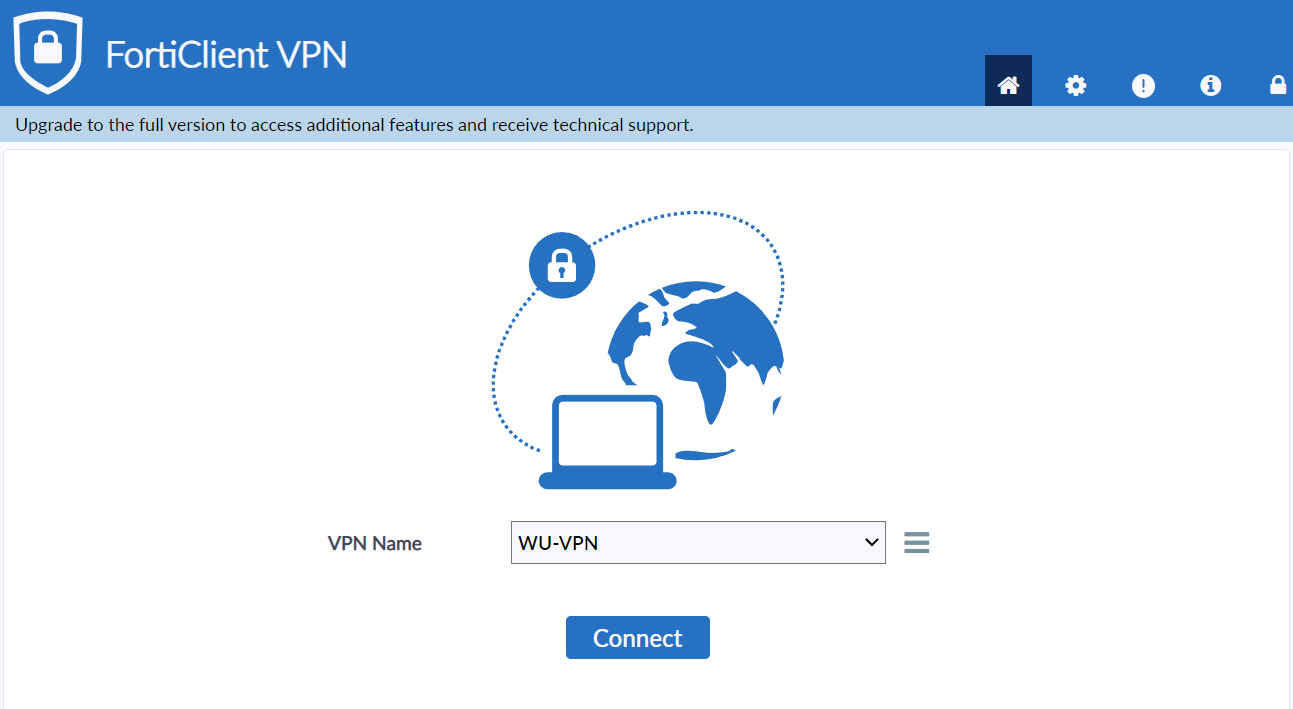](https://bookstack.wu.ac.th/uploads/images/gallery/2026-02/GJmimage.png) 6\. เข้าสู่ระบบด้วยบัญชี **Microsoft 365** เมื่อยืนยันตัวตนเรียบร้อยแล้ว สามารถเข้าใช้งาน VPN ได้ทันที [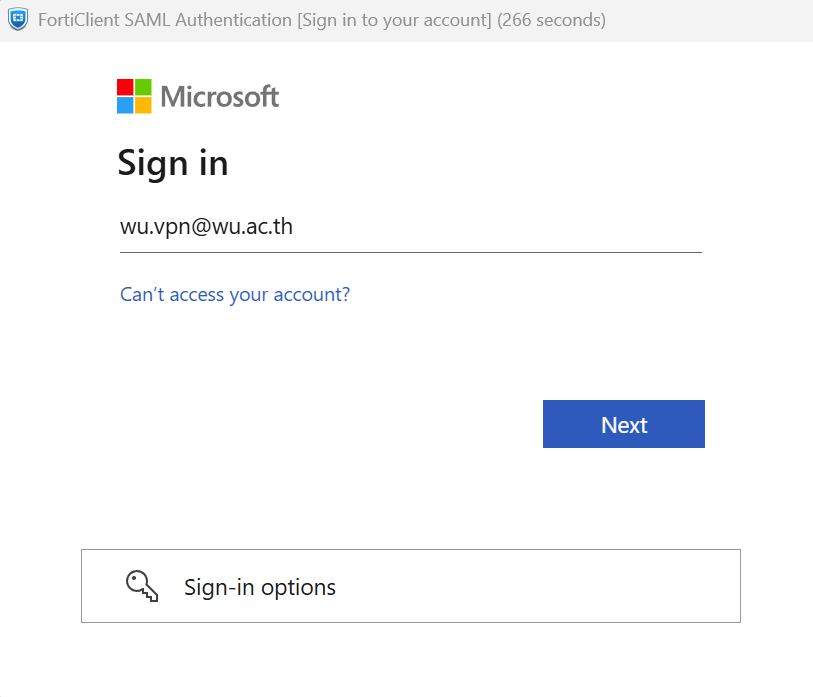](https://bookstack.wu.ac.th/uploads/images/gallery/2026-02/lwmimage.png)หาก Login ผ่านโปรแกรมจะทำการเชื่อมต่อ VPN โดยระบุหมายเลข IP Address และแสดง Icon มุมขวาของ Windows เพื่อเป็นการยืนยันว่าเชื่อมต่อ VPN สำเร็จแล้ว
[](https://bookstack.wu.ac.th/uploads/images/gallery/2023-09/image-1695712956431.png)[](https://bookstack.wu.ac.th/uploads/images/gallery/2023-09/image-1695712969763.png) ##### **การยกเลิกการเชื่อมต่อ VPN (Windows)** เมื่อสิ้นสุดการใช้งานสามารถยกเลิกการเชื่อมต่อ VPN ได้ดังนี้ คลิกขวาที่ สัญลักษณ์มุมล่างขวา และกดปุ่ม **"Disconnect"** [](https://bookstack.wu.ac.th/uploads/images/gallery/2024-05/image-1715584848149.png)หากเปิดหน้าต่างของ FortiClient VPN อยู่แล้วสามารถกดปุ่ม **"Disconnect"** ได้เลย หรือ กดปุ่ม **"Shutdown FortiClient"** ได้เหมือนกัน
--- ### สำหรับ **Windows****สำหรับ MacOS ให้เลือก Download VPN for MacOS**
[](https://bookstack.wu.ac.th/uploads/images/gallery/2026-02/Y91image.png) 1\. เลือก Download ที่หัวข้อ Download VPN for Windows [](https://bookstack.wu.ac.th/uploads/images/gallery/2024-05/image-1715572530676.png) \*ตัวอย่างไฟล์สำหรับติดตั้ง FortiClient VPNตัวติดตั้งอาจจะมี Version ที่แตกต่างกันจากในคู่มือ
2\. ดับเบิ้ลคลิกที่ Icon ไฟล์ติดตั้ง จะเข้าสู่หน้าจอติดตั้งโปรแกรม [](https://bookstack.wu.ac.th/uploads/images/gallery/2024-05/image-1715572616325.png) 3\. จากนั้นกด **"Open"** เพื่อดเปิดโปรแกรมติดตั้ง [](https://bookstack.wu.ac.th/uploads/images/gallery/2024-05/image-1715573198033.png) 4\. โปรแกรมจะแสดงสถานะ Downloading ผ่าน Internet โดยความเร็วขึ้นอยู่กับการเชื่อมต่อ network ของผู้ใช้งาน [](https://bookstack.wu.ac.th/uploads/images/gallery/2024-05/image-1715573428401.png) 5\. หากขึ้นข้อความ Downloaded แล้วให้กดปุ่ม **"Install"** เพื่อดำเนินการติดตั้ง [](https://bookstack.wu.ac.th/uploads/images/gallery/2024-05/image-1715573437638.png) 6\. หลังจากนั้นให้กดปุ่ม **"Continue"** [](https://bookstack.wu.ac.th/uploads/images/gallery/2024-05/image-1715573625140.png) [](https://bookstack.wu.ac.th/uploads/images/gallery/2024-05/image-1715573667769.png) 7\. หากปรากฏหน้าจอตามด้านล่าง ให้กดปุ่ม **"Agree"** [](https://bookstack.wu.ac.th/uploads/images/gallery/2024-05/image-1715573754834.png) 8\. ขั้นตอนต่อไปกดปุ่ม **"Install"** [](https://bookstack.wu.ac.th/uploads/images/gallery/2024-05/image-1715573808737.png) 10\. เมื่อติดตั้งเรียบร้อยแล้ว จะขึ้นหน้าต่างตามภาพด้านล่างนี้ จากนั้นให้กดปุ่ม "Close" [](https://bookstack.wu.ac.th/uploads/images/gallery/2024-05/image-1715573841326.png) 11\. ค้นหาชื่อโปรแกรม "FortiClient" [](https://bookstack.wu.ac.th/uploads/images/gallery/2024-05/image-1715573933987.png) ##### **การตั้งค่า VPN(MacOS) เพื่อเชื่อมต่อและใช้งาน** 1\. คลิกที่ Icon  โปรแกรมจะแสดงหน้าเพื่อเปิดใช้งานครั้งแรก 2\. ทำเครื่องหมายถูกที่ช่อง **I acknowledge….** แล้วกดปุ่ม **I accept** [](https://bookstack.wu.ac.th/uploads/images/gallery/2023-09/image-1695712534246.png) 3\. คลิกเลือก **Configure VPN** [](https://bookstack.wu.ac.th/uploads/images/gallery/2023-09/image-1695712588990.png) 4\. ให้กำหนดค่าตามข้อมูลที่กำหนดไว้ข้างล่างดังนี้ - - - - - - - VPN เลือกแบบ IPsec VPN - Connection Name: **WU-VPN** (หรือใส่ชื่อตามต้องการ) - Description: **WU\_VPN\_Connect** (หรือใส่ข้อความตามต้องการ) - Remote Gateway: **vpn.wu.ac.th** - Authentication Method เลือกเป็น "**Pre-Shared key"** และใส่ key ในช่องว่าง **wu@vpn** - ทำเครื่องหมายถูกที่ช่อง Enable Single Sign on (SSO) for VPN Tunnel ใส่หมายเลข Port: **2002** กดที่เครื่องหมาย **+ Advanced Settings** ไปที่ VPN Settings ตั้งค่าดังนี้ - - - - - - - หัวข้อ IKE ให้เลือก **Version 2** กดที่เครื่องหมาย **+ Advanced Settings** ไปที่ Phase 1 ตั้งค่าดังนี้ - - - - - - หัวข้อ DH Group ให้ติ๊กเลือก **5** และ **20** [](https://bookstack.wu.ac.th/uploads/images/gallery/2026-02/7d3image.png) [](https://bookstack.wu.ac.th/uploads/images/gallery/2026-02/ieVimage.png) [](https://bookstack.wu.ac.th/uploads/images/gallery/2026-02/24Cimage.png) เมื่อกำหนดค่าต่างๆ เสร็จเรียบร้อยแล้ว ให้กดปุ่ม **Save** 5\. จากนั้นโปรแกรมจะขึ้นหน้าต่าง ให้ กด **Connect** เพื่อเชื่อมต่อ VPN [](https://bookstack.wu.ac.th/uploads/images/gallery/2026-02/GJmimage.png) 6\. เข้าสู่ระบบด้วยบัญชี **Microsoft 365** เมื่อยืนยันตัวตนเรียบร้อยแล้ว สามารถเข้าใช้งาน VPN ได้ทันที [](https://bookstack.wu.ac.th/uploads/images/gallery/2026-02/lwmimage.png)หาก Login ผ่านโปรแกรมจะทำการเชื่อมต่อ VPN โดยระบุหมายเลข IP Address และแสดง Icon มุมขวาของ Windows เพื่อเป็นการยืนยันว่าเชื่อมต่อ VPN สำเร็จแล้ว
[](https://bookstack.wu.ac.th/uploads/images/gallery/2024-05/image-1715574521410.png) [](https://bookstack.wu.ac.th/uploads/images/gallery/2023-09/image-1695712956431.png) ##### **การยกเลิกการเชื่อมต่อ VPN (MacOS)** เมื่อสิ้นสุดการใช้งานสามารถยกเลิกการเชื่อมต่อ VPN ได้ดังนี้ คลิกขวาที่ สัญลักษณ์มุมบนขวา และกดปุ่ม **"Disconnect"** [](https://bookstack.wu.ac.th/uploads/images/gallery/2024-05/image-1715585032716.png)หากเปิดหน้าต่างของ FortiClient VPN อยู่แล้วสามารถกดปุ่ม "Disconnect" ได้เลย